Video Inputs
Multiple different video inputs are supported. Some will work straight out of the box while others will need additional drivers. Some video inputs are only available on certain platforms but that is stated in the list below. If you have a question about support for certain video input, please contact your Voysys representative.
All video inputs have a few settings in common.
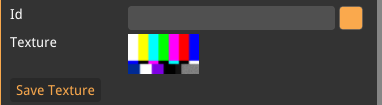
- ID
-
Set an ID on the input to differentiate between multiple inputs. Name and color can be selected for each input.
- Texture
-
Preview of the texture.
- Save texture
-
Save the current texture to a .png file.
Argus (Jetson only)
Captures video from cameras connected to NVIDIA Jetson platforms via the Argus / libargus EGL stream API. Provides direct control over the on-board ISP (exposure, gain, white balance, denoise).
- Camera
-
Selects which connected Argus camera to use.
- Mode
-
Selects a sensor mode (resolution and frame rate combination) supported by the chosen camera.
- Start/Stop
-
Starts or stops capturing from the selected camera.
- Auto Exposure
-
When enabled, the ISP controls exposure automatically. When disabled, the exposure time can be set manually.
- Exposure Time
-
Manual exposure time, in milliseconds. The valid range depends on the sensor.
- Auto Analog Gain
-
When enabled, analog gain is controlled automatically. When disabled, the gain can be set manually.
- Analog Gain
-
Manual analog gain. The valid range depends on the sensor.
- Auto Digital Gain
-
When enabled, digital gain is controlled automatically. When disabled, the gain can be set manually.
- Digital Gain
-
Manual digital gain. The valid range depends on the sensor.
- Exposure Compensation
-
Available when any auto control is enabled. Biases the auto-control target value up or down.
- AWB Mode
-
White balance mode. Options: Off, Auto, Incandescent, Fluorescent, Warm Fluorescent, Daylight, Cloudy Daylight, Twilight, Shade, Manual.
- WB Gain
-
Per-channel white balance gains (R, G even, G odd, B). Available when AWB Mode is Manual.
- Saturation
-
Optional control over the ISP saturation level.
- Optical Black
-
Optional per-channel black-level offsets.
- Antibanding Mode
-
Flicker reduction. Options: Off, Auto, 50 Hz, 60 Hz.
- Denoise Mode
-
ISP denoise. Options: Off, Fast, High Quality. When not Off, Denoise Strength is available.
- Edge Enhance Mode
-
ISP edge enhancement. Options: Off, Fast, High Quality. When not Off, Edge Enhance Strength is available.
- Camera Crop
-
Adjust the active sensor region (offset and size) used for capture.
Clone Stream
The Clone Stream input clones the video stream from another entity. This is useful when only one video input can be connected to a certain interface at the time. In some instances clone stream is necessary, for instance to get the video from a Remote Streamer or Virtual Camera.
- Source
-
Which video source that this input should clone from.
- Focus Region
-
Enable focus region.
- Copy To Texture
-
By default, Clone Stream uses the original video source texture when displaying it along with any filters. Copy To Texture changes this behavior to instead make a copy of the cloned texture. This also enables the hard crop functionality. When copy to texture is enabled you can modify any filter applied without changing the source video filter.
- Hard Crop
-
Crops the size of the texture in GPU memory instead of cropping it during display.
Direct Show (Windows only)
Direct Show is a Windows API for capturing and displaying video sources. It supports many different camera devices.
| If a dedicated input type exists for a device, use that instead for improved performance and lower latency. For example NDI. |
- Device Name
-
The available devices that can be captured.
- Rescan Devices
-
Rescan for new devices.
- Rescan And Show All Devices
-
Rescan for new devices and showing all found devices, including devices that we do not recommend using with Direct Show.
- Resolution
-
The video resolution.
- Capture Rate
-
Different resolutions can have a specific range of available frame rates. This sets the range and the frame rate setting sets the specific frame rate for the input.
- Frame Rate
-
The frame rate of the video.
- Pixel Format
-
The video pixel format. Different pixel format can have different performance.
- Retry
-
If enabled, the software will continue to try to connect to the camera if it is disconnected, e.g. if a cable is pulled out and then inserted.
Display Capture
Will capture the selected screen.
- Cursor
-
If enabled, the cursor will be visible in the display capture.
- Monitor
-
Selects which monitor should be captured.
FFmpeg
A generic FFmpeg-backed input.
- URL
-
The source URL or path.
- Input Format
-
Optional explicit FFmpeg input format name (e.g.
mpegts,flv,rtsp). Leave empty to let FFmpeg auto-detect. - HW Acceleration
-
Enables hardware-accelerated decoding when supported.
- Live Source
-
When enabled, treats the source as a live stream. Disables looping and seeking.
- Src Open Timeout
-
Time to wait for the source to start, in seconds. Useful for slow-to-respond sources.
- Buffer Time
-
Amount of buffered media to keep, in seconds.
- Loop
-
Loops the source when it reaches the end. Inactive when Live Source is enabled.
- Auto Start
-
Starts the source automatically when the project loads.
- Options
-
A list of additional
name/valuepairs passed to FFmpeg as input options. Use Add to append, Remove to delete an entry. - Playtime Master
-
Optionally synchronise playback time with another FFmpeg input in the project.
File
Plays back a video file (MP4, MKV, AVI, WebM, etc.), with seek and playback controls.
- Open File
-
Opens a file picker to select the video file.
- Close
-
Unloads the current file.
- HW Acceleration
-
Enables hardware-accelerated decoding when supported.
- Loop
-
Loops the file when it reaches the end.
- Play On Transition
-
Resumes playback when the scene becomes active.
- Auto Start
-
Starts the file automatically when the project loads.
- Buffer Time
-
Amount of buffered media to keep, in seconds.
- Play / Pause
-
Toggle playback.
- Play Time
-
Current playback position, displayed as HH:MM:SS.MS. Drag to seek.
- Progress slider
-
Drag to seek within the duration of the file.
Flir (Spinnaker)
This is the video input for capturing FLIR cameras (USB3 Vision). This input requires a driver to work, contact your Voysys representative to get information about which version is compatible.
- Try to Reconnect
-
If enabled, will try to reconnect to the select camera if disconnected.
- Start/Stop
-
Start and stop the camera.
Only appears after a device is selected. - Rescan Devices
-
Rescans the devices on the interfaces that already has been detected.
- Rescan Devices and Interfaces
-
Rescan devices as well as scanning for new interfaces.
- Device
-
The available devices.
- Custom Resolution
-
Make custom resolutions available for the user.
- Resolution
-
The video capture resolution.
- Pixel Format
-
The pixel format the camera will send. Not all formats are available on all cameras.
- Auto Frame Rate
-
If enabled it will automatically set the camera to the highest possible frame rate.
- Frame Rate
-
The frame rate of the camera, the camera interface does not show available frame rates so we refer to the camera specifications. The console will output an error if the frame rate is not supported. This settings is only visible if "Auto Frame Rate" is disabled.
- Advanced
-
- Center Image
-
When using a resolution lower than the maximum, the camera will send a subset of the image. If "Center Image" is enabled it will put the subset in the center. If disabled, the user can set wherein the sensor the subset should be taken from by changing the "Offset X" and "Offset Y" variables.
- Binning
-
Binning combines pixels on the camera which makes the image from the camera smaller but uses a larger part of the sensor. This is useful when wanting to reduce the data transmitted from the camera but still get the image from the whole sensor. When changing the binning, the resolution must be changed also. It means that if the max resolution is 3000x4000 pixels and binning is set to 2x2 the selected resolution must be the max resolution divided by the binning, i.e 1500x2000 pixels.
- Auto Exposure
-
Enables the auto exposure, depending on its state different settings can be set.
- Enabled
-
If auto exposure is enabled a tab with settings will be visible. It gives the user the ability to set a minimum and maximum value which the auto exposure can work in between. This setting might be needed to make the camera reach its highest frame rate since the minimum exposure time could be too long by default.
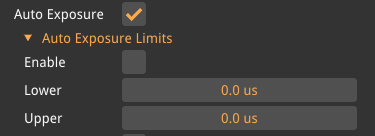 Figure 2. Auto exposure settings.
 - Disabled
-
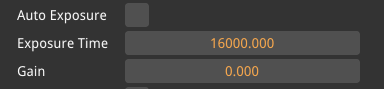
When auto exposure is disabled, the user can set the exposure time as well as the gain manually.
- Auto WB
-
If enabled, auto-corrects the white balance. When disabled, settings for manually adjusting the white balance are available.
- Buffer Count
-
The buffer count is the amount of frames the camera can buffer if the software does not read the frame quick enough, for example during a frame stutter. It is recommended to use the default value.
- Reset on Startup
-
Resets the camera on startup, this can help with weird behaviors such as when the camera is stuck in a specific USB speed mode. This can make the startup of the camera slower.
- Reset Camera
-
Resets the camera, can be used if the camera is misbehaving. This operation takes a while!
GigE
Receives video from GigE Vision cameras using the GenICam protocol over Ethernet.
- Serial / IP
-
Select the camera by serial number or IP address. The list is populated from discovery on connected interfaces.
- Capture Type
-
How frames are received from the network. Options:
-
Socket — standard UDP sockets. Highest compatibility.
-
Pcap — uses libpcap (available when the binary is built with pcap support).
-
Oden Filter Driver — Windows-only, uses the Voysys kernel filter driver for the lowest CPU overhead.
-
- Access Mode
-
Exclusive takes full control of the camera. Monitor taps into the multicast stream from another (master) receiver without configuring the camera.
- Settings Master
-
Optionally slave this camera’s settings to another GigE input in the project, so changes apply to both.
- GenICam Parameters
-
A dynamic list of camera-specific parameters exposed by the connected device (exposure, gain, ROI, trigger modes, etc.). The exact set depends on the camera model.
- Multicast Interface
-
When Access Mode is Monitor, selects which network interface to receive multicast traffic on.
- Restart on Stall
-
Automatically reconnects if no frames have been received for a few seconds.
- Frame Completion Settings
-
- Acceptable Issue Ratio
-
A frame is delivered as long as at least this fraction of its packets arrived. Frames with fewer packets are dropped. Default 0.7.
- Clear Buffers To Black
-
Fill any missing pixel data in incomplete frames with black instead of leaving the previous frame contents.
- Filter Driver tuning
-
- Max Packets Per Transfer
-
Number of packets read per kernel transfer (Oden Filter Driver only).
- Buffer Size
-
Size of the kernel ring buffer used by the filter driver.
GStreamer
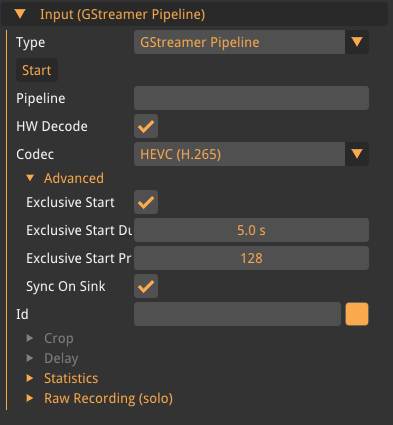
This input will take a regular Gstreamer pipeline and input the video data to Oden. The video data will be put to the odenvideosink plugin, the sink can be added into the pipeline as ! odenvideosink processing-deadline=0 or be left out. If it is left out Oden will add it internally.
- Start
-
Starts the pipeline.
- HW Decode
-
Enable or disables the hardware decoder for the input.
- Codec
-
Set the codec for the hardware decoder, available selection is H.264, H.265 and MJPEG.
- Advanced
-
- Exclusive Start
-
Enable exclusive start, sets a time between when different pipeline should start so only one starts at a time.
- Exclusive Start Duration
-
Time between pipeline starts.
- Exclusive Start Priority
-
Sets priority, lower number starts earlier.
- Sync On Sink
-
Sets the property
sync=trueon the gstreamer pipeline if enabled.
HLS
Receives HTTP Live Streaming (HLS) playlists in real time.
- URL
-
The URL of the
.m3u8playlist. - HW Acceleration
-
Enables hardware-accelerated decoding when supported.
- Src Open Timeout
-
Time to wait for the source to start, in seconds.
- Buffer Time
-
Amount of buffered media to keep, in seconds.
- Auto Start
-
Starts the source automatically when the project loads.
- Start / Stop
-
Begins or ends reception.
IDS
Captures video from IDS uEye cameras (USB3 and GigE), exposing the manufacturer’s image-processing controls (exposure, gain, white balance, trigger modes).
- Device
-
The IDS camera to use, listed by serial number.
- Re-init
-
Retries camera initialization.
- Capture Rate
-
Frame rate, in Hz. The valid range depends on the current sensor configuration.
- Auto Exposure
-
When enabled, exposure time is controlled by the camera. When disabled, Exposure Time can be set manually.
- Exposure Time
-
Manual exposure time, in milliseconds.
- Auto Gain
-
When enabled, gain is controlled by the camera. When disabled, Gain can be set manually.
- Gain
-
Manual gain, range 0–100.
- Auto Reference
-
Target brightness for auto exposure/gain, range 0–255.
- Auto Speed
-
How aggressively auto exposure/gain reacts to brightness changes, range 0–100.
- Auto Hysteresis
-
Tolerance band that prevents oscillation around the Auto Reference value, range 0–10.
- White Balance
-
White balance algorithm. Options include Auto (Kelvin), Auto (Grayworld), sRGB D50/D65, CIE RGB E, ECI RGB D50, and AdobeRGB D65.
- Color Temp
-
Manual colour temperature in Kelvin, when applicable. The valid range depends on the camera.
- Trigger Mode
-
How frames are triggered. Options:
-
Normal — software trigger; the camera streams continuously.
-
Master — the camera outputs a PWM signal that can drive other cameras.
-
Slave — the camera is triggered by an external hardware signal.
-
- Slave To
-
When Trigger Mode is Slave, select which other IDS camera (in Master mode) acts as the trigger source for synchronised exposure.
NDI
Receives NDI (Network Device Interface) streams from compatible senders on the local network.
- Device
-
The NDI source to receive from. The list is populated from the local NDI source registry.
- Quality
-
Bandwidth versus quality trade-off. Options: Lowest or Highest.
- Start
-
Begins NDI stream reception.
RTMP
Receives RTMP (Real-Time Messaging Protocol) streams.
- URL
-
The RTMP URL, e.g.
rtmp://host/app/stream. - HW Acceleration
-
Enables hardware-accelerated decoding when supported.
- Loop
-
Loops the source when it reaches the end (only meaningful for sources of finite duration).
- Auto Start
-
Starts the source automatically when the project loads.
- Open Timeout
-
Time to wait for the source to start, in seconds.
- Buffer Time
-
Amount of buffered media to keep, in seconds.
- Start
-
Begins reception.
- Play / Pause
-
Toggle playback, when the stream has a known duration.
- Play Time
-
Drag to seek within the stream, when seekable.
RTP
Receives raw RTP (Real-time Transport Protocol) packets on a UDP port.
- Codec
-
The codec of the incoming stream. Options: MJPEG or H.264.
- Port
-
UDP port to listen on, range 0–65535.
- Start / Stop
-
Begins or ends reception.
RTSP
Real-Time Streaming Protocol(RTSP) is a network protocol for video and audio which is often used by IP cameras.
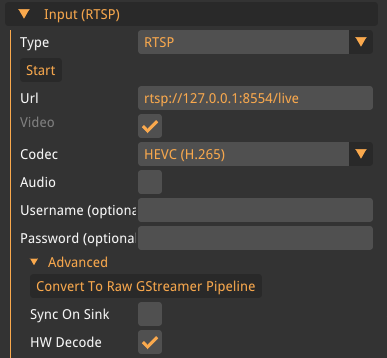
- Start
-
Start receiving the RTSP stream with the current settings.
- Url
-
The url to the RTSP server should have similar structure as the following URL
rtsp://127.0.0.1:8554/live. The structure of the URL consist of an Ip address, a port number and which stream from the server that should be listen to, which is the 'live' part of the example URL. - Video
-
Enable or disable the video from the stream.
- Codec
-
Which incoming codec that the stream uses. Currently supported are H.264 and MJPEG. H.265 over RTSP requires the GStreamer RTSP variant (use "Convert To Raw GStreamer Pipeline" under Advanced).
- Audio
-
Enable or disable the audio from the stream.
- Username
-
Some RTSP server requires a username.
- Password
-
Some RTSP server requires a password.
Advanced
- Convert To Raw GStreamer Pipeline
-
Converts all settings to a pure GStreamer pipeline.
- Sync On Sink
-
GStreamer gives a timestamp when the frame should be displayed, if 'Sync On Sink' is enabled then the frame is presented when the timestamp occurs.
| For live feeds, it is recommended to have 'Sync On Sink' set to disabled. However, for prerecorded video, it is recommended to have it set to enabled. |
- HW Decode
-
Enables the hardware decoding for the codec.
Spout (Windows Only)
Spout is a frame sharing system for Windows. It can receive the texture from other programs that have implemented the Spout protocol. Spout shares the textures over the GPU which means that both systems must use the same GPU. Performance can differ if the sending program uses DirectX since not all GPUs have support for DirectX to OpenGL texture transformation. Whether the GPU has support for it is shown under the 'info' tab.
- Source
-
The available Spout source that is currently sending on the system.
- Use Alpha Channel
-
Some programs might use alpha values that does not follow the standard format, therefor this button enable/disable the use of the alpha channel.
- Log Spout Messages
-
Logs the Spout messages to file, the file will be located in the same location as the project file. Hover over the button to see the exact location.
- Info
-
Some info about the system and the Spout capabilities.
Test Source
Test source is a video input that contains multiple different videos that can be used as a placeholder for a camera.
- Resolution
-
The resolution of the test source.
- Pattern
-
The available pattern to choose from.
Some of the patterns are static which will make the drop detector kick in, turn off the drop detector when using those!
V4L2 (Linux only)
Video for Linux version 2 (V4L2) is an API for realtime video capture on Linux systems. It supports many USB webcams and other camera devices.
- Device
-
The camera you want to receive video from.
- Pixel Format
-
The video pixel format.
- Resolution
-
The video resolution.
- Frame Rate
-
The video frame rate.
- Controls
-
Displayed when the video input is active. Controls various aspects of supported cameras, such as exposure time, brightness, contrast, etc.
- Advanced
-
- Blocking Mode
-
Block and wait for the camera to send us an image. Necessary for certain cameras. Try enabling if you have issues receiving video.
- Retry Until Success
-
Repeatedly try to establish a connection with the camera until successful. Can be useful if you cannot guarantee that the cameras are running when starting the application.
- Use Custom Path
-
Use a custom device path. Should not be needed in most cases.
- Custom Path
-
A custom device path in case your camera does not show up in the list, e.g.
/dev/v4l/DEVICE_ID.